IntroductionThis tutorial demonstrates how to control your Lego EV3 robot with one finger dragging on the screen. From the middle of the screen, you drag the small icon forward and robot will go forward, drag icon backward and robot will go backward, so is left and right, etc. You can learn how to transfer touch point’s coordinate into robot’s motor speed. Notice: You don’t have to write a program for the EV3, just power it on and pair with your Android phone. App Inventor’s EV3 components can talk to Lego EV3 brick with a special protocol called Lego EV3 Direct Command. These commands are actually byte arrays which can be executed directly by Lego EV3 bricks. Lego EV3 components were developed by CAVEDU Education and merged to official AI2 in 2016. Basic dual-wheel robot platformCore component of this project:
Please assemble your robot like Figure 1, if you are not familiar with Lego brick, please check this assembly tutorial (use lesser parts) or Lego Official TRACK3R building tutorial (use far more parts). If your robot looks a little different, that’s fine. Just make sure the two motors (attach to port B and C) are on the opposite side of robot. This kind of robot base is called a differential drive platform because the robot’s behavior can be easily adjusted according to the motor speed. For instance, the robot will go forward with both motors moving at the same speed and will turn right with the left motor moving a little slower than the right motor.
Figure 1a. dual-wheel robot platform Figure 1b. Use tracks to make your robot cooler (Image source: Lego.com) Take a look of a real cool Lego robot!
Figure 1c~1e. physical photo of Lego track robot. Power on your EV3 and pair it with your Android phone (default key: 1234). You can check whether the robot’s EV3 is on with the Bluetooth icon at the upper-left screen corner.
Figure 1c, 1d. Check EV3 Bluetooth is turned on. . App InventorNow log into MIT App Inventor site and create a new project.DesignerIn the Designer page of App Inventor platform, please add these components and place them as shown in Figure 2. For details, please refer to Table 1. For connection, the ListPicker selects a paired Bluetooth device, your Lego EV3 in this case. A Disconnect button closes the Bluetooth connection with Lego EV3. There is a canvas with a ball component inside, user can drag this ball to drive the robot moving around. Note: Ball1 is in Canvas1, since we set its Visible property to false, then you can not see it on Designer. Figure 2. Designer Table 1. Required components of this project
BlocksSTEP1 Initialize variable for motor power:This project used several variables:
Figure 3. STEP2 ListPicker for connecting Lego EV3We use a ListPicker to show paired devices with your Android device and connect to it by selecting in the Listpicker. This is a better approach and less chance of type error for user to input EV3’s bluetooth address in a TextBox. Before we click the Listpicker, we must set its elements first(ListPicker1.BeforePicking event). Here we have to set its element to paired devices (BluetoothClient1.AddressAndNames).
Figure 4a. Initialize and what’s inside the ListPicker
Click to open the ListPicker, we are going to connect (BluetoothClient1.Connect) our paired EV3 by selecting it (ListPicker1.AfterPicking). If connect successfully, Listpicker will be disabled, and Ball1 will show up at the center of Canvas, means user can touch the canvas to drive the robot. Figure 4b. Select an item to connect to Lego EV3 STEP3 Drag finger to move the robot:This is the largest code of this project, including three parts:
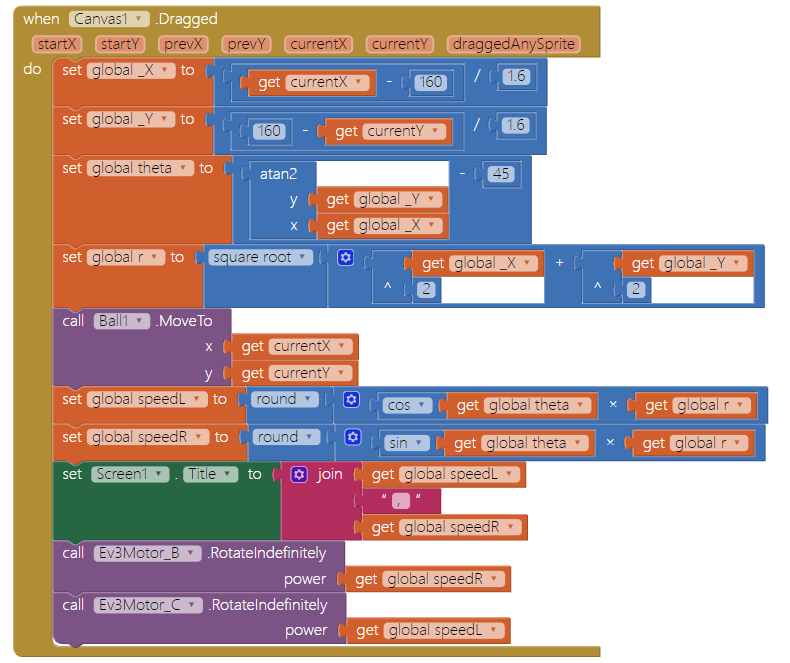
Let’s discuss them in detail:
First take a look of the relationship of these variables. We would like to transfer the current touch point coordinate to motors’ speed. According the figure below: Figure 5a. The origin of canvas is at the top-left corner not the center, so we have to shift the origin: representing by _X and _Y:
And for theta and r, we will use trigonometric function to calculate the angle theta. which means with larger r with, this will make your robot more controllable and fun.
Figure 5b.
We want the ball component to follow our finger movement, so use Ball.MoveTo command with x as currentX and y as currentY. And calculate speedL and speedR by the follow equation and show these two values on Screen title.
Figure 5c.
Use Ev3Motor.RotateIndefinitely command to control rightmotor(B) and left motor (C). Figure 5d. Finally, our Canvas.Dragged event is finished: Figure 5e. STEP4 Finger up to stop the robotIn our case, we wish the robot will stop when our finger is no longer touch the screen. Therefore in Canvas.TouchUp event, we use two Ev3Motor.Stop(set useBrake to true) command to stop two motors and let the ball component return to the canvas center. Figure 6. Set power variable to slider’s thumb position. STEP5 Disconnect:When Button_Disconnect is pressed (Button_Disconnect.Click event), we tell BluetoothClient to disconnect from EV3 brick and set listpicker and ball to original status, ready for the next connection. Like Figure 8. Figure 7. Disconnect from Bluetooth device TipsOnce you have paired your device with EV3 robot, then press its power button and check that the EV3’s BT is switched on. Press the [Choose your EV3] listpicker and choose the name of the paired EV3 to connect, you will see the ball appeared when connected successfully. Please click each button to see how robot moves and also drag the slider to adjust motor power. App starts up like Figure 9, please click Connect ListPicker and select your EV3 (figure 10). Click and connect successfully, you can click the five buttons in the middle of the app to control your robot. Enjoy! Click Disconnect button to close the Bluetooth connection with EV3,
Figure9a. robot goes forward with left/right motor speed (51, 56) Figure 9b. robot turns right with left/right motor speed (-20, 56) Brainstorming
|


